Exceleration: Power Apps Get Sharepoint Data using Power Automate

I have explored enhancing Powerapps performance by using caching techniques with SharePoint REST APIs, avoiding the need for premium connectors. By leveraging three phases of logic—validating, updating expired data, and handling new entries—I optimized data retrieval. We implemented a “Power Automate” flow for fetching and caching SharePoint data. This facilitates smoother and cheaper operations within Powerapps, using conditions to manage data freshness and validity effectively.

I have recently thought about caching in Powerapps using collections.  Cached data can help with performance.  I’ve been investigating the use of SharePoint REST APIs in place of Connectors to SharePoint…

  • avoid challenges with delegation
  • leverage pagination
  • cache SP JSON responses

Caching implies that you want to use a recent version of data that in the cache and has not yet expired. 

3 phase logic follows:

  • If the entry is valid (exists and has not expired), then just simply return the cached data from the cache/collection.
  • If the entry exists in the collection, but has expired (e.g. the data hasn’t been refreshed in x number of seconds, then get a fresh copy of the data and update (aka patch) the invalid entry.
  • If there is no entry in the cache, then get a fresh copy of the data and save (aka patch) in the cache (collection)

Power function “COALESCE” helps to facilitate this.  Coalesce will essentially try an option and if that option is invalid, it will try the next option.

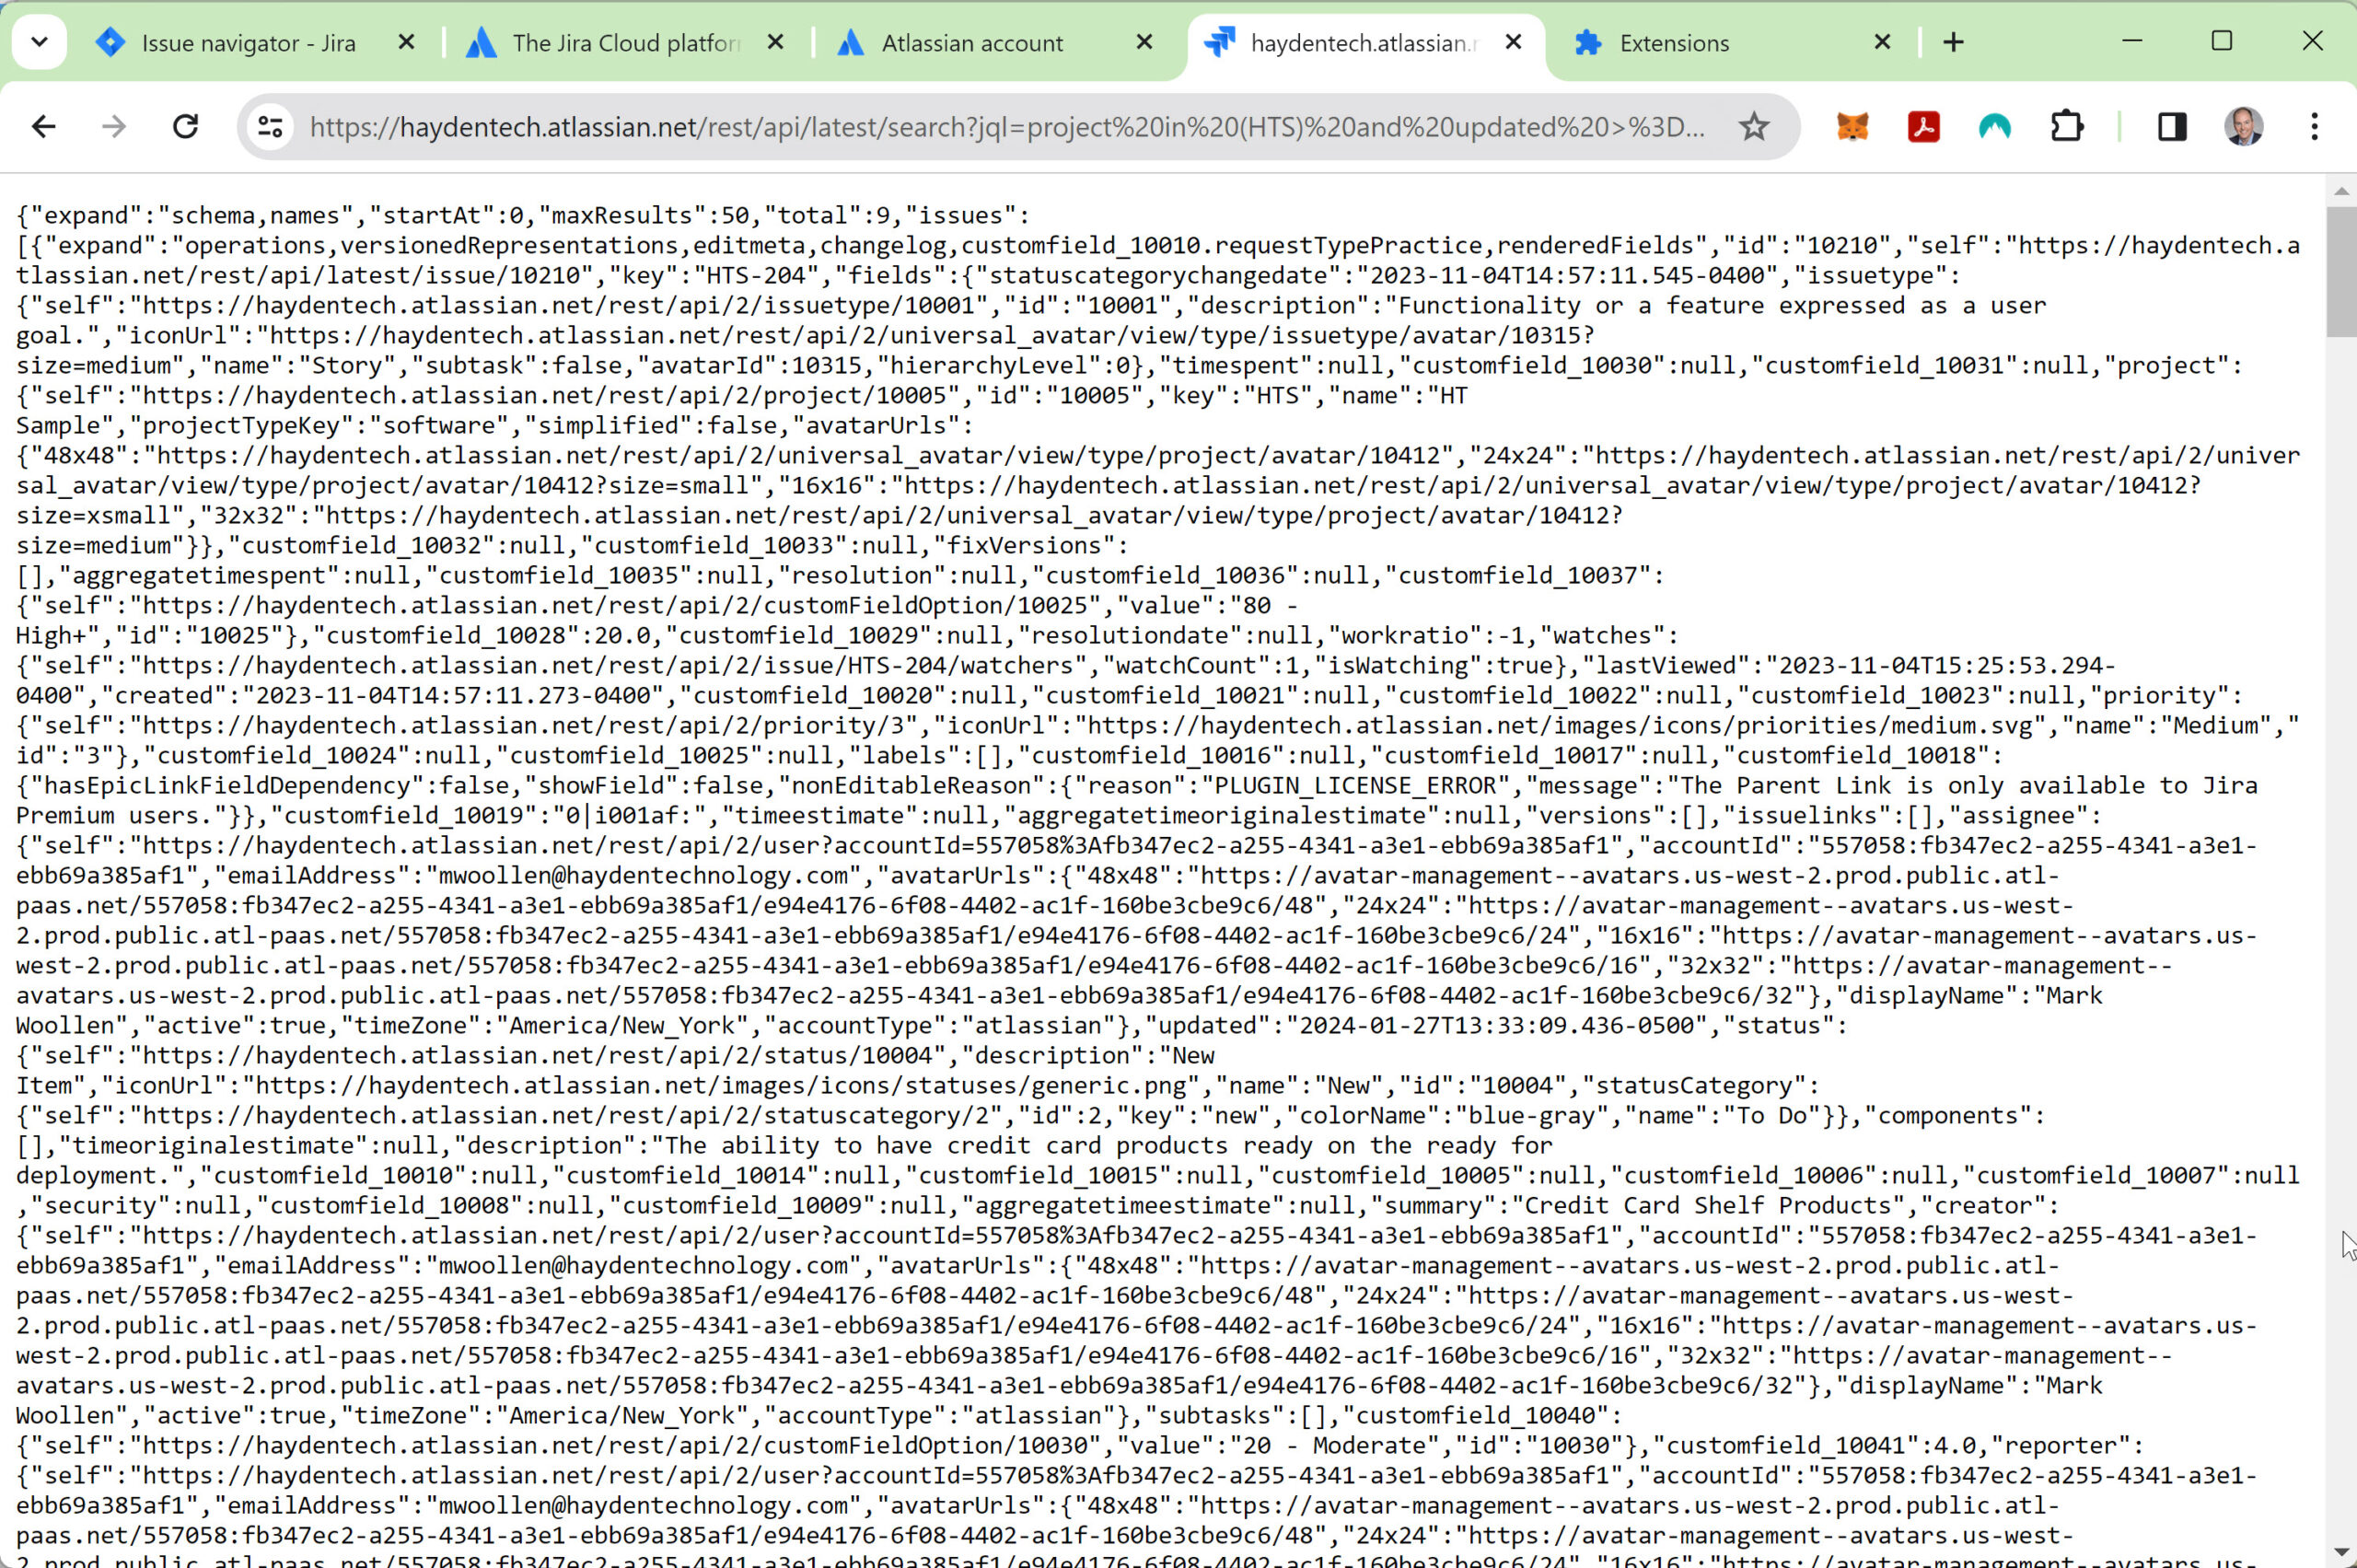
Create a Power Automate flow called “Generic Sharepoint API Call” that will make a generic GET call to SharePoint and returns the resulting JSON (even if the JSON results contain a list, this list can be stored as a single JSON object in cache along with a set a timestamp.  What’s cool is that this flow does not require any premium connectors or special magic (well, perhaps a little magic).  

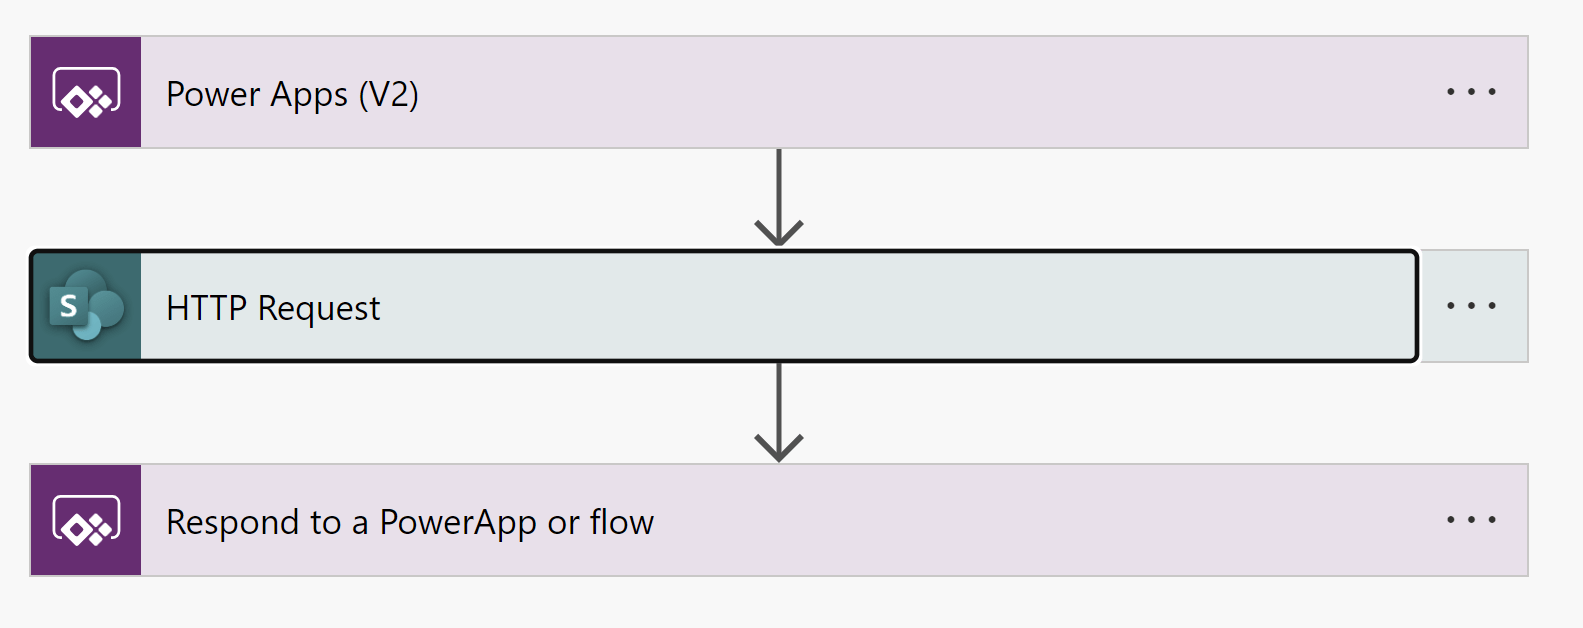
  • In the first step, define two inputs: in_baseurl and in_restcall.
  • In the second step, send in_baseurl to Site Address and in_restcall to URI.  Also add Header “Accept” = “application/json;odata=nometadata”.  I also rename this step = “HTTP _Request”.
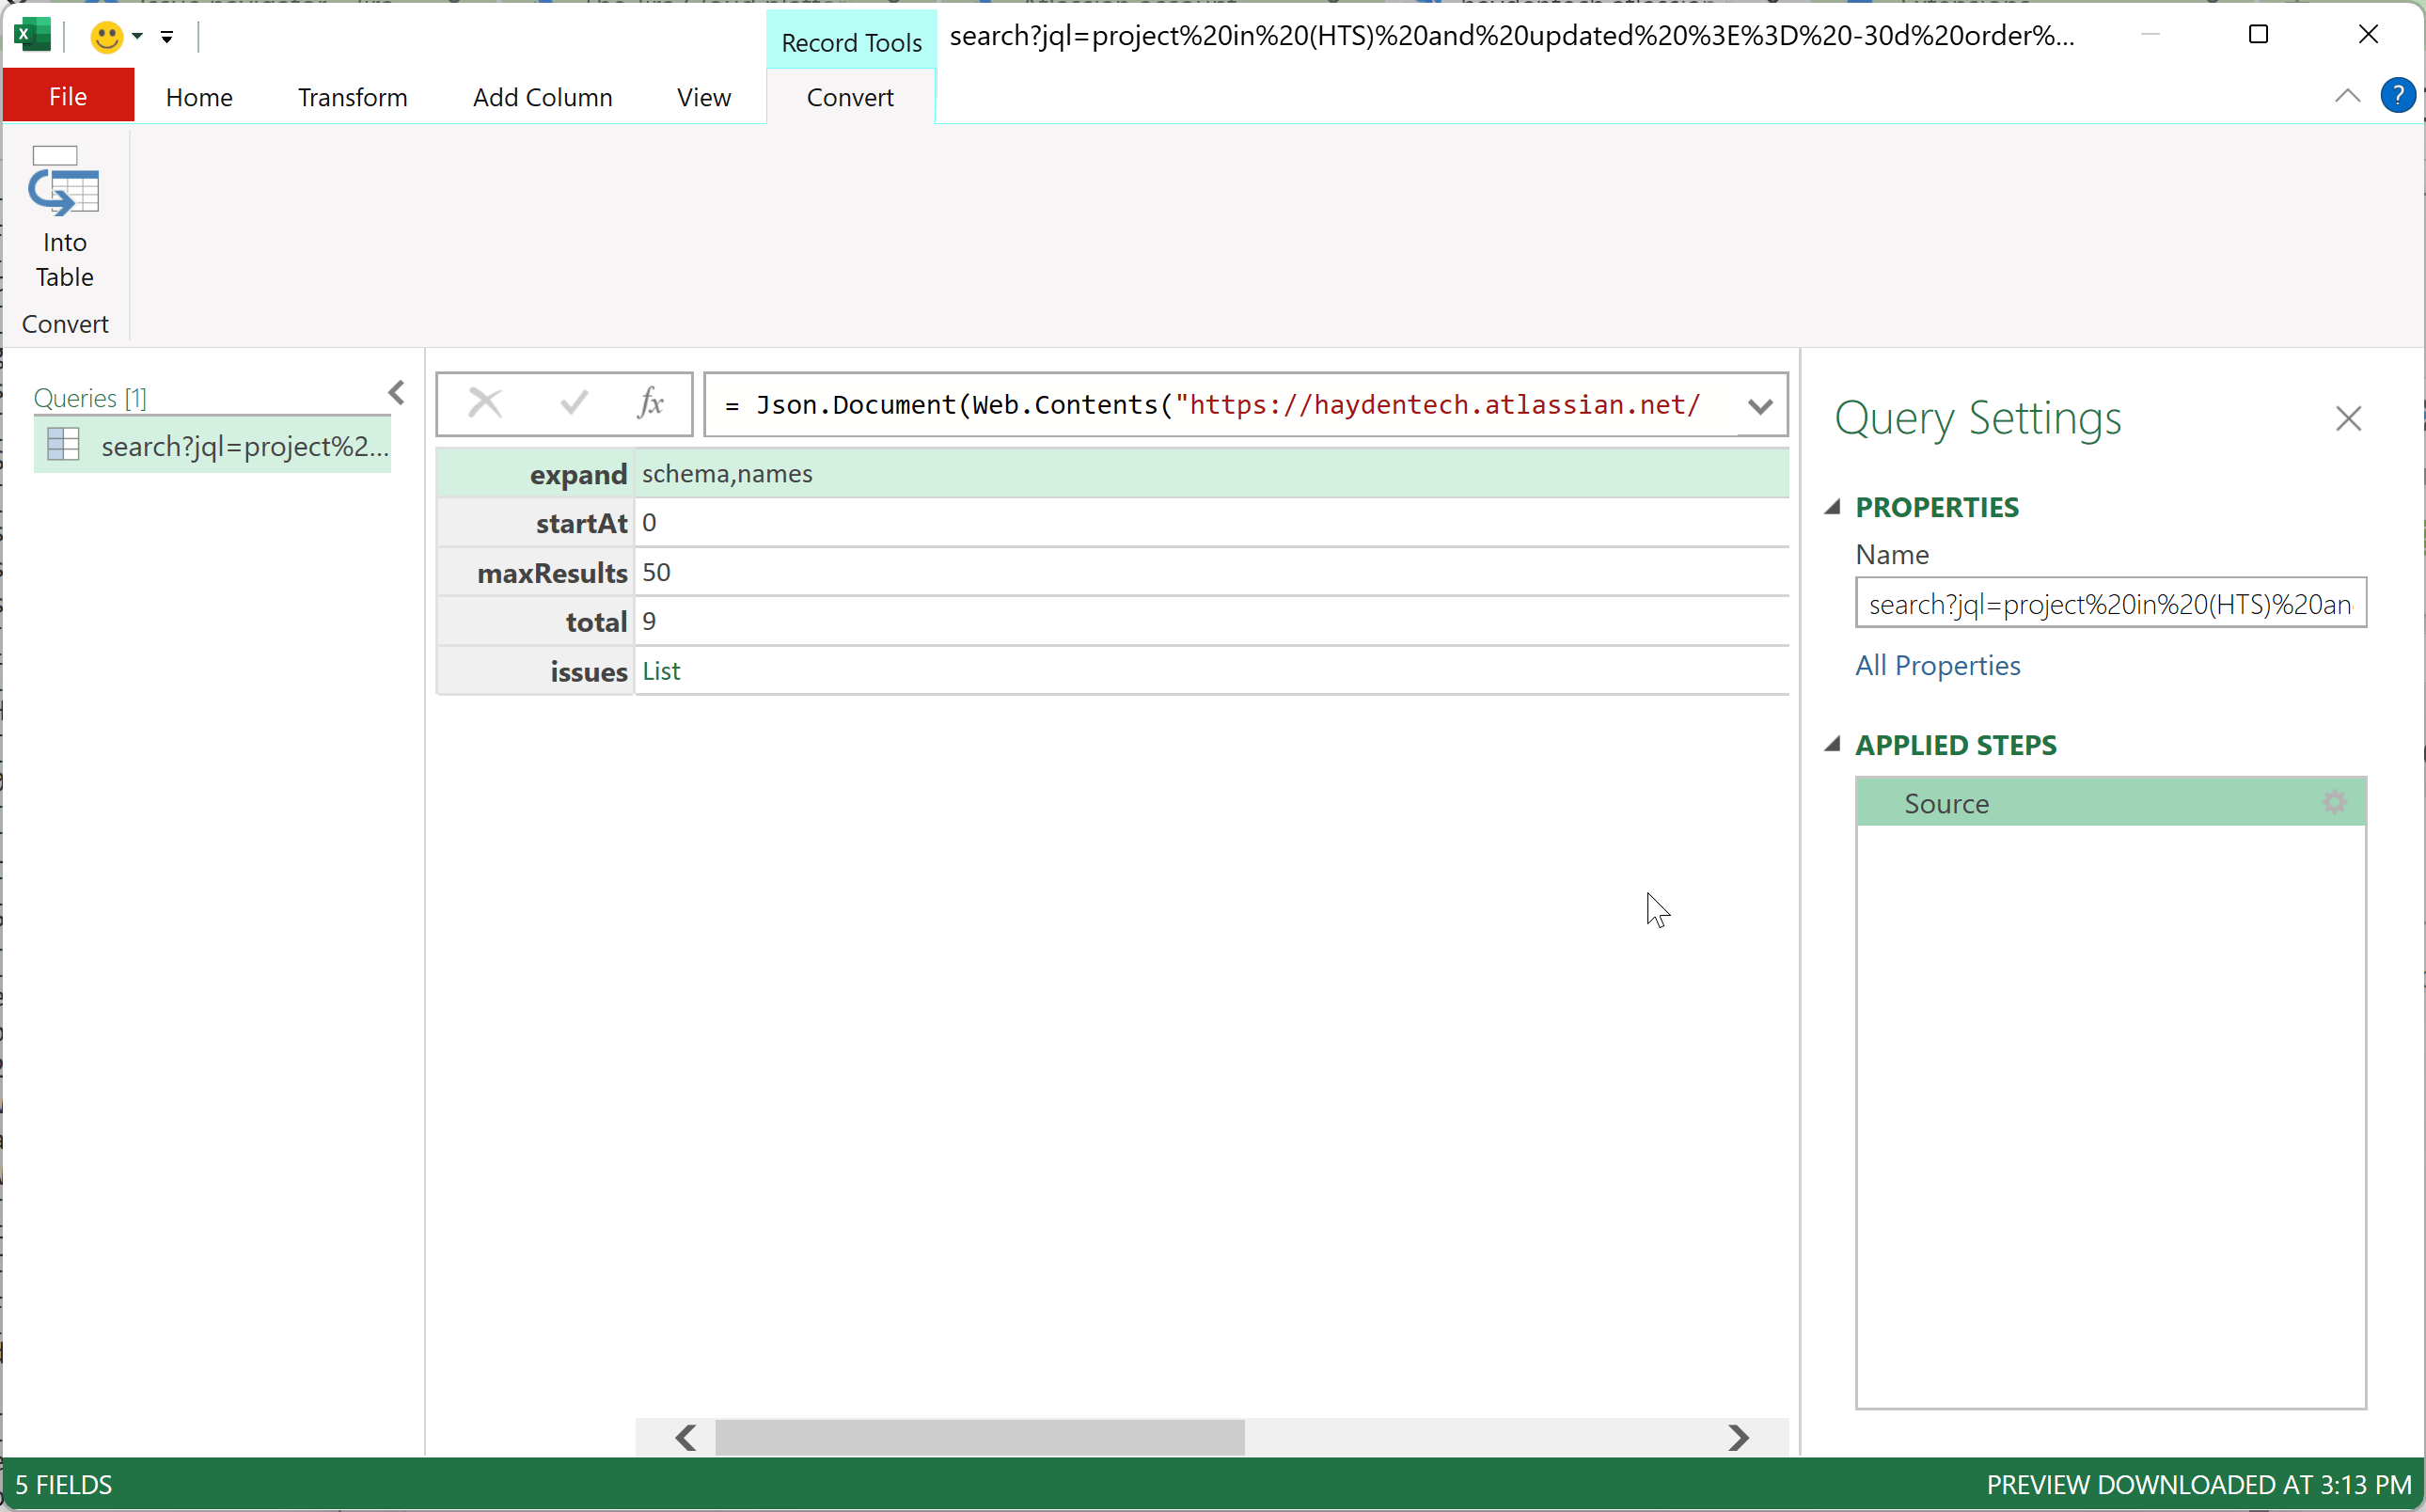
  • In the third step, return “data” with expression “string(body(‘HTTP_Request’))”

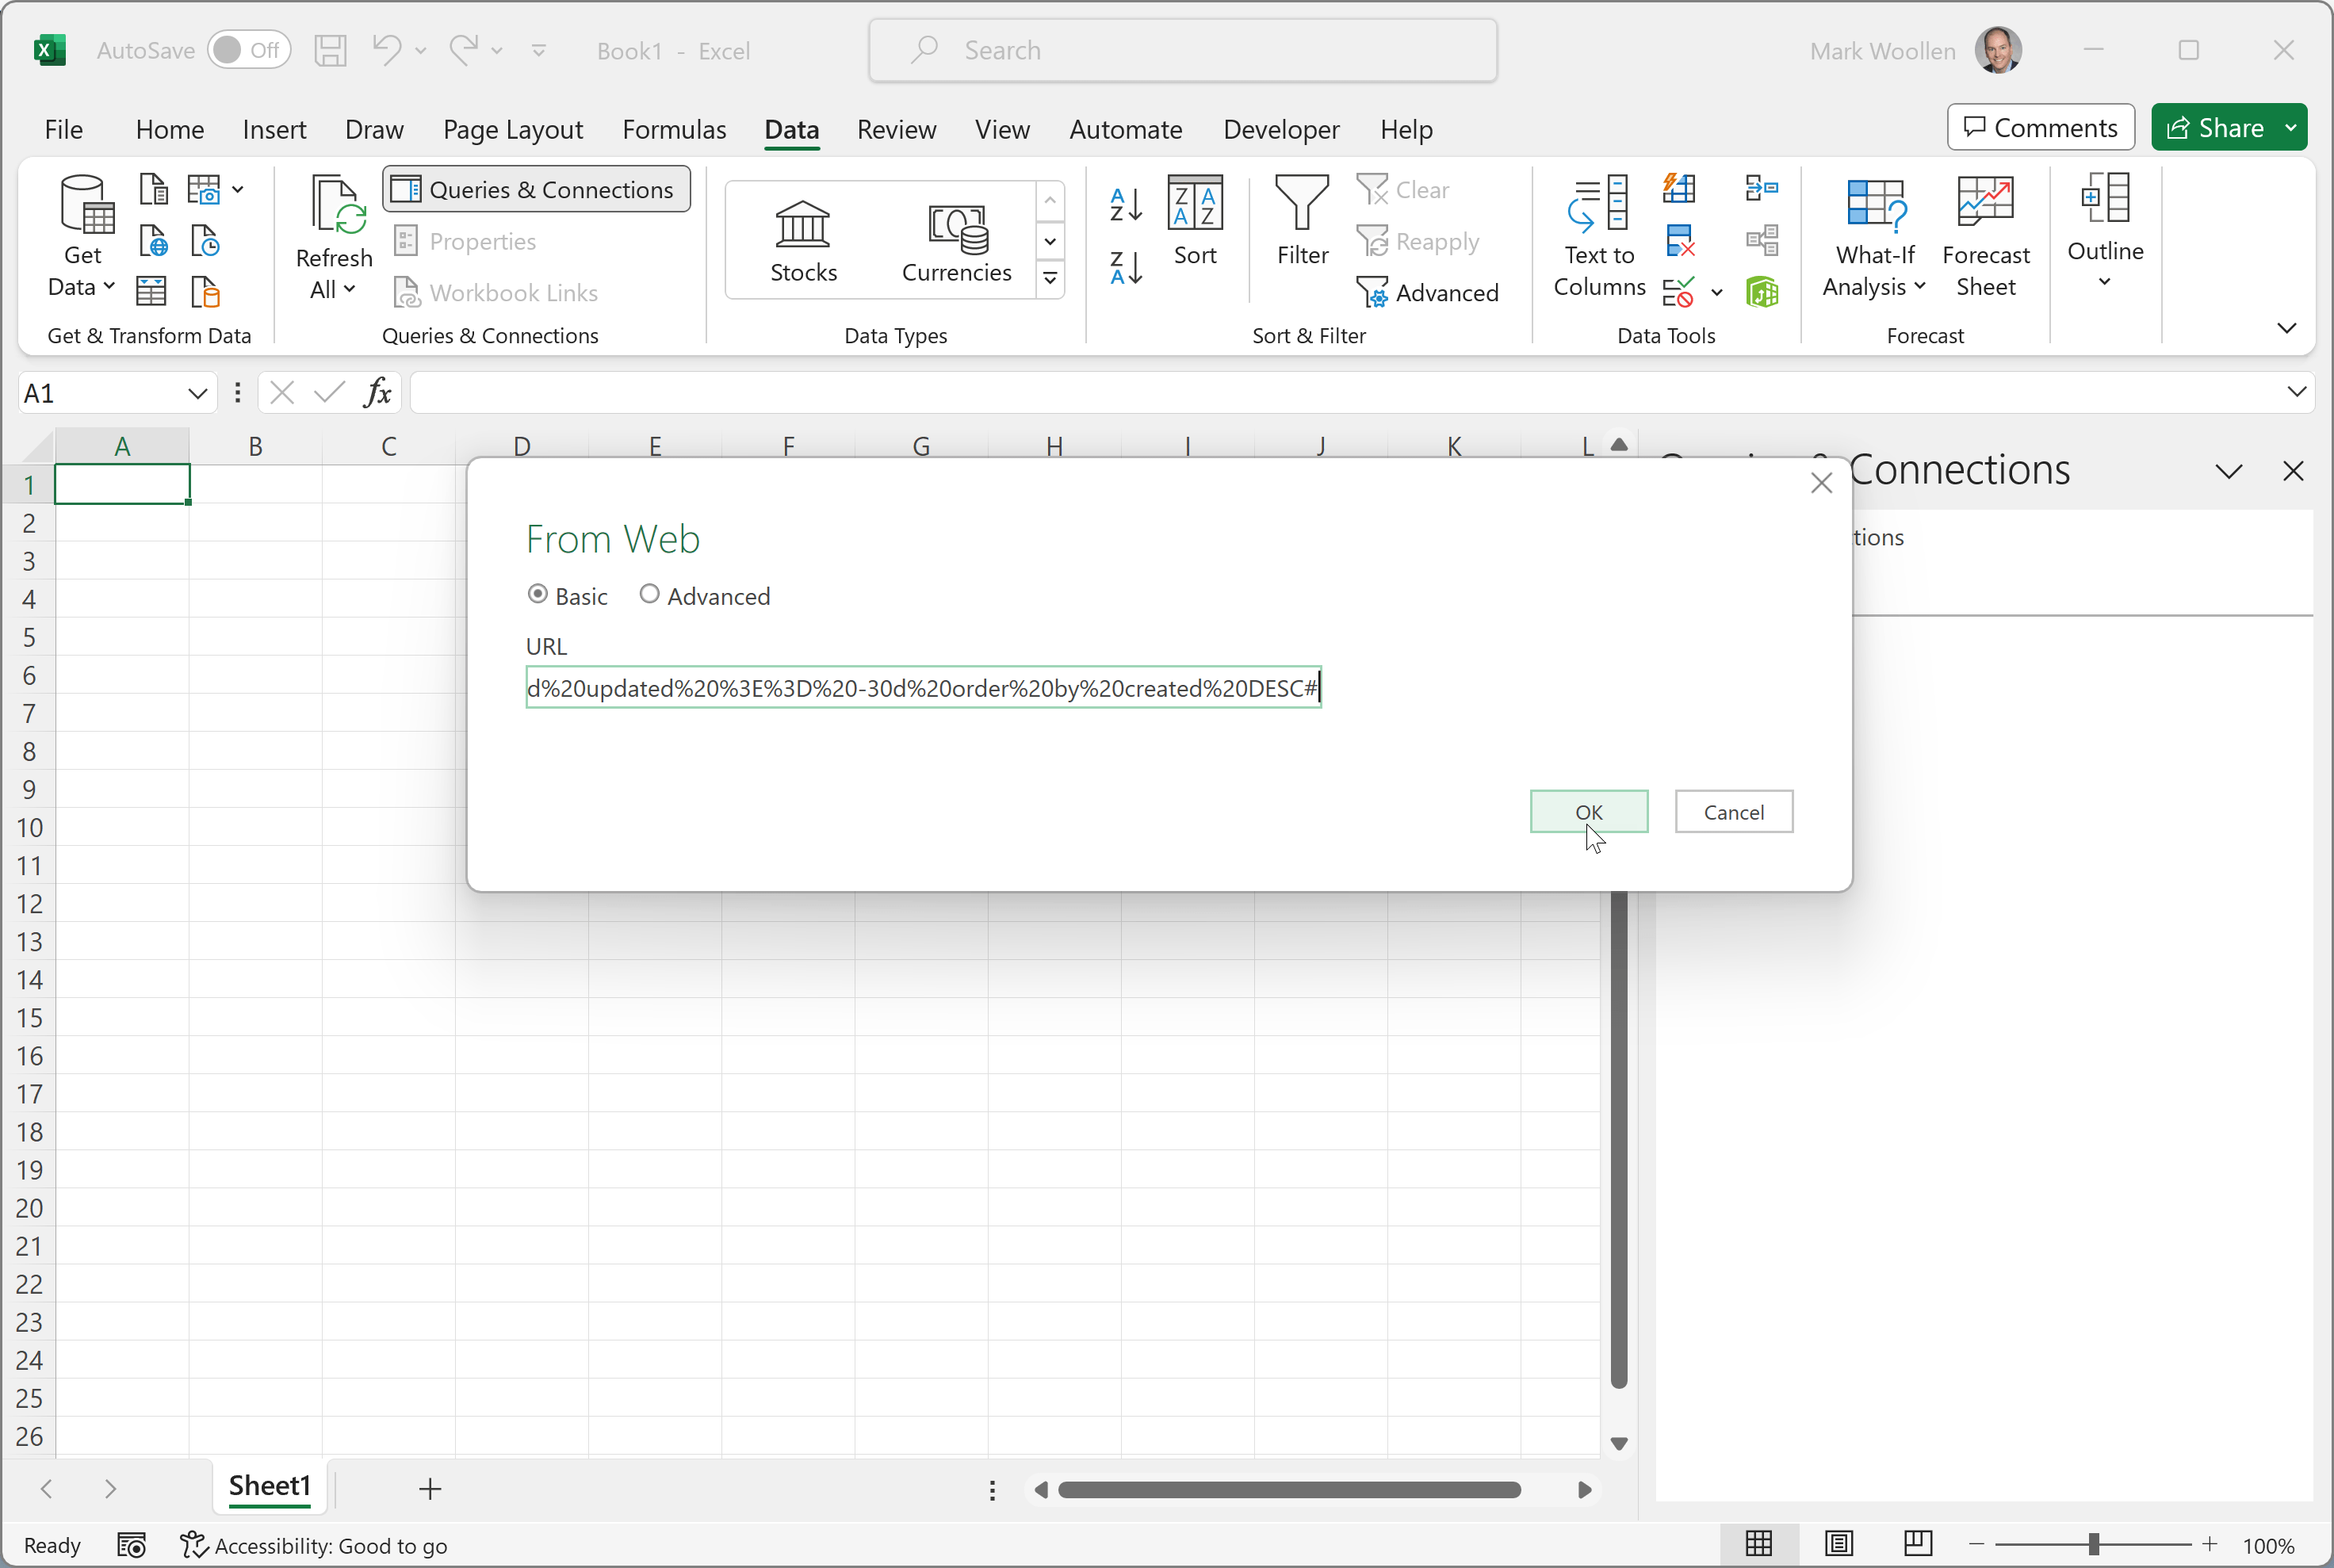
Now, you can add this flow to Powerapps using the “Power Automate” configuration button.

OK, about the cache (collection) in Powerapps.  A collection called coll_httprequests with columns “httprequest”, “httpresponse”, and “timestamp” will be created by the component and available to your Powerapps.  My cached item in this case will expire after 145 seconds.  

Create an invisible component, add a property named “get” of type “Action” that returns Text.  Add 3 input parameters: in_baseurl (type text), in_request_uri (type text), and in_expiry (type number).  Place the following in the result.

If(LookUp(Sort(coll_httprequests,timestamp,SortOrder.Ascending),httprequest=in_request_uri).timestamp > (Now() - in_expiry/24/60/60), LookUp(Sort(coll_httprequests,timestamp,SortOrder.Ascending),httprequest=in_request_uri), Patch(coll_httprequests, Coalesce( LookUp(Sort(coll_httprequests,timestamp,SortOrder.Ascending),httprequest=in_request_uri), Defaults(coll_httprequests)), {httprequest:in_request_uri,httpresponse:'HT-GenericSPCall'.Run(in_baseurl,in_request_uri).data,timestamp:Now()} )).httpresponse

Now, add this component to your Powerapps.  And now you can call Component_1.

get("https://_____.sharepoint.com/sites/____", "_api/web/lists",30)

And then parse the results into a Table.  This is a little tricky… you need to know the structure of the response.  See https://learn.microsoft.com/en-us/sharepoint/dev/sp-add-ins/working-with-lists-and-list-items-with-rest. Set(var_getit7,

SPConnect.get(var_baseurl,"_api/web/lists",60)); ClearCollect(coll_splists, DropColumns(AddColumns( Table(ParseJSON(var_getit7).value), "Title", Text(Value.Title), "Id", Text(Value.Id), "Description", Text(Value.Description), "DecodeURL", Text(Value.ParentWebPath.DecodedUrl), "ImageURL", Text(Value.ImageUrl) ),"Value"));

I provided some “write up” on how to do the Power Flow HTTP call to SharePoint in a “non-premium” way.  https://sharepoint.stackexchange.com/questions/282308/how-to-send-json-data-to-power-apps-from-power-automate-ms-flow

Cheers!

Exceleration: Import JIRA data into Excel using Power Query and JIRA REST API

Create reports and inspect data from JIRA using Excel easily, efficiently and intelligently. JIRA by Atlassian may be the most popular Agile project management tool embraced by Scrum Masters, Product Owners, developers, testers and the organizations that depend on them. Excel by Microsoft is undoubtedly the most widely used spreadsheet (data analysis and reporting) tool used by leaders, communicators and basically anyone that uses a computer. What if you could have your Jira cake and eat it with Excel, too?

What if you could create reports and inspect data from JIRA using Excel easily, efficiently and intelligently? JIRA by Atlassian may be the most popular Agile project management tool embraced by Scrum Masters, Product Owners, developers, testers and the organizations that depend on them. Excel by Microsoft is undoubtedly the most widely used spreadsheet (data analysis and reporting) tool used by leaders, communicators and basically anyone that uses a computer. What if you could have your Jira cake and eat it with Excel, too?

JIRA provides a full set of REST APIs giving programmable access to create, read, update and delete (CRUD) the data maintained behind-the-scenes. Microsoft Excel (since 2016) provides Power Query capabilities that enable “easy button” refresh capability within your worksheets, pivot tables, charts and dashboards. Wait… what? Here, I’ll show you. Follow these steps

Get a Jira API Token

Go to Security API Tokens. To find this the normal way, click top-right icon and select “Manage Account”.  Then, go to Security Tab, scroll down and select Create and Manage API Tokens. Click “Create a new key”, enter name then be sure to copy/save your Key in a safe place (for security reasons, it will only be visible this one time)… You’ll use this as your password in Excel Power Query to connect to Jira APIs.

Search for Jira items using Jira Query Language (JQL)

Jira Query Language allows you to filter, sort and retrieve Jira data. Click on “Issues” in your project or menu item “Filters” and “Search for all issues.”  To search for targeted issues, you can modify the filter on Jira fields like Project, Type, Status, Assignee and more.

Retrieve Jira data from REST APIs

Many cloud applications transport data between data store and user interface via REST APIs (Representational State Transfer Application Programming Interface). Often, these APIs are made available for external access. We will use the APIs and the resulting data to feed into Excel. First, let’s try out the REST API. You can do this right in your browser. You’ll need:

    • Jira Base URL (see section above)
    • REST API (see JIRA Cloud REST API documentation online)… the request we’re looking for is Issue Search (/rest/api/3/search)
    • JQL Query (notice the URL from the Search for Jira Items above (specifically jql=project%20in%20(HTS)… you could also take the JQL string (with spaces) and encode a URL friendly string using https://www.urlencoder.org/… I find it easier to just grab it from the browser URL address.

Putting it all together… [Jira Base URL] + [REST API] + “?” + [JQL Query] and paste into a browser window… you get a bunch of data in JSON format.  JavaScript Object Notation (JSON), is an open data interchange format that is both human and machine-readable.

Jira REST API search results in JSON format

Create a Power Query (available in Excel since 2016 and Microsoft’s Power Query M Formula Language

OK… now, we want to pull the all this together and connect Excel to the JIRA APIs using Power Query.  Go to Data –> Get Data –> From Other Sources –> From Web

Excel Get JIRA Data from Web

Excel Power Query Get Data from JIRA

Copy in the full used above to retrieve JSON data from JIRA

You may (should) be prompted to enter your Jira credentials.  Generally, you’ll only be prompted once for this as Excel will store your credentials / settings for each unique website in the OS for future workbook connections… OK, pay attention here, there are numerous authentication options available.. you want to use “Basic” Authentication… use your Jira username  (your email address in Jira Cloud) and use the Jira Access Token created in the step above.

Once you are successfully authenticated… the JSON data will be interpreted by Microsoft Power Query and allow you to make selections (or use M Query in advanced editor)

Pretty cool.